Lesson 138
Learning Objectives
By the end of this session, I should be able to answer these questions:
1. What are five benefits of navigating underwater?
2. What four basic features does an underwater compass have? What is the purpose of each?
3. How should I hold a compass when navigating with it underwater?
4. How should I set a compass to navigate a straight line from one point to another? How should I set it to return along the same line (the reciprocal heading)?
5. How should I use an electronic compass to navigate?
Finding Your Way
During your open water dives, you will learn and practice basic underwater navigation with a compass. Navigating underwater has at least five benefits:
- It helps you plan your dive so you don’t waste air trying to find the best parts of the dive site.
- It allows you to avoid long surface swims by navigating to your ascent/exit point underwater.
- It helps you take the shortest route to the boat or shore if you have a problem.
- It lets you avoid certain areas if necessary, or stay within a certain area.
- It reduces stress, because you know generally where you are at any point of the dive, and you can be less concerned about how far you are from your exit/ascent point, etc.

Compass Features
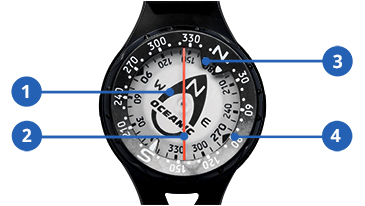
In learning to use a compass, you’ll either use a standard (analog) underwater compass, or an electronic compass (typically part of your dive computer). The standard underwater compass has four basic features you use when navigating underwater.

1. Magnetic north needle
2. Lubber line
3. Bezel with index marks
4. Heading references
Magnetic north needle – This is a needle (or an arrow printed on a card) that can rotate so it always points to magnetic north (as long as the compass is level and not too close to something made of steel or iron). The north needle is the basis for compass navigation, because you know that it is always pointing in the same direction. Compass navigation is simply determining direction relative to the north needle’s known direction.
Lubber line – This is a straight line through the center of the compass face or along the side from the 6 o’clock to the 12 o’clock positions. The lubber line is always your direction of travel.
Bezel with index marks – The bezel rotates so you can align two, small parallel marks (index marks) over the north needle. This helps you maintain a straight line while swimming and navigating. Some compasses have two sets of index marks. The second set is 180º opposite the first. This lets you set a return (reciprocal) course without having to reset the compass.
Heading references – Most compasses have numbers to record your heading (your travel direction, measured in degrees from magnetic north). Some compasses have detailed markings (a mark every two degrees), whereas others may only have 0º, 90º, 180º and 270º. More detail gives you more precision; you may write down headings on your slate and in your dive log for reference when returning to and relocating a site.
Holding, Setting and Navigating with a Compass
Before discussing how to set your compass, let’s look at how you hold it. Properly holding and positioning your compass is important for swimming in a straight line. If you don’t hold your compass properly, you won’t navigate accurately even if you set it correctly

Hold your compass so it’s relatively level (so the north needle can rotate) and so the lubber line is aligned with the centerline of your body. Wearing the compass on your wrist, hold the arm without the compass straight out. Hold it with your other hand near the elbow, putting the compass straight in front of you. With a console, hold the compass squarely in front of you with both hands.
With either method, lock your arms and look over the compass, not down on it. This allows you to watch where you’re going while continuing to read it. To set your compass and navigate a straight line from one point to another (typically, from where you are in a direction you want to go, or toward a known destination), follow these steps:
- Hold the compass as you just learned with the lubber line pointed in your desired travel direction.
- Let the north needle settle on magnetic north, then rotate the bezel until the index marks straddle the needle.
- Continuing to hold the compass properly, swim along the lubber line keeping the needle within the index marks. Remember that the lubber line is always your travel direction, regardless of which way the compass needle points.
- If you turn off course, the needle will drift outside the marks, cuing you to correct your direction. Don’t move your arms. Turn your body to return to the correct course, then continue.
Typically, one buddy in the team navigates, while the other buddy(ies) maintains contact and watches the depth. Buddies continue to communicate as they do this, and not let themselves get so focused on navigation or depth that they don’t pay attention to each other.

To set a reciprocal (return) heading so you go back along the same line, rotate the bezel to set the index marks 180 degrees from your original setting. Turn until the north needle is within the marks again; you will then be facing the way you came. As mentioned, some compasses have two sets of index marks directly opposite each other. If yours does, don’t move the bezel. Simply turn until the north needle is within the other (reciprocal) index marks.
PADI Underwater Navigator Course
Underwater navigation isn’t difficult, but it is a skill you have to learn. Like many skills, you learn it faster with guidance followed by practice and application.
The PADI Underwater Navigator course builds upon your basic navigation skills. In the course, you learn to use natural navigation (navigating based on what you see) and compass navigation together, as well as patterns to return to your start point.
You also learn to find your way back to a spot so you can revisit favorite places or find something you dropped
You can enroll in the PADI Underwater Navigator course as a newly certified PADI Open Water Diver, and the first dive of the course credits (at your instructor’s discretion) toward your PADI Advanced Open Water Diver certification.
Electronic Compass
Your dive computer may have an electronic compass built in, but not all computers do. Electronic compasses differ in how they show direction and how you read them. Check the manufacturer literature or ask your instructor for help for specifics if your computer is equipped with one.

With most electronic compasses, hold the compass as previously described and face your desired travel direction. The compass shows you the heading as a number (0 degrees to 359 degrees). Hold the compass squarely in front of you as you swim, keeping the same heading showing. If the number changes, you’re turning off course. Stop and turn until you’re back on your heading.
To set a reciprocal course, if your original heading is 179 degrees or less, add 180 degrees to find the reciprocal heading. For 180 degrees or more, subtract 180 degrees. This gives you the degree number for the return heading. Some electronic compasses have other functions for assisting with navigation.
Tip: “Round” degree headings (e.g., 160, 170, 180, etc.) are often close enough for general navigation in moderate to good visibility. This makes it easier to add or subtract 180º mentally. But, use the precise heading for the most precise navigation, which you may need when looking for a specific dive site or when navigating in low visibility.
knowledge review and quiz
Comments

I'll take you diving!
Copyright © Larry Wedgewood Scuba Instruction All Rights Reserved


